


 今後、力をいれていきます。

PSMゲーム
 Bloodred Wyvern (ブラッドレッドワイバーン)
 Bloodred Wyvern 2
 Gravity Anomaly Zone 不可思議重力帯
その他
 PlayStation®Mobile関連リンク集
 PlayStation®Mobile学習日記

XBLIG
 BLASTER AND AMETHYST
 BLASTER AND MORION
 LEUCISTIC WYVERN
 Bioerosion
 URGENT EVASION 360
 The Undead Syndrome / TUS 2
 Dark Storm Blast 360
その他
 Making Of The Undead Syndrome[3DCG]
 Making Of The Undead Syndrome2
 XNA関連リンク集
 xna学習日記
 第1〜3話
第1〜3話
 第4〜5話
第4〜5話
 第6〜7話
第6〜7話
 第8〜9話
第8〜9話
 第10〜12話
 第13〜14話
 第15話
第15話

DirectX
 3DRPG「シゾンフェーズ」
実用ソフト
 簡易温度チェッカー

ブラウザゲーム
 発火少年の地面焦がし
 MAGICAL METEOR SHOWER

 メタセコイア備忘録
 東日本大震災(Aftermath of the 2011 Tohoku earthquake and tsunami)

 ムカゴソフトウェア開発
 e-mail:cqp00202@nifty.ne.jp
第10話で、
そこで、バウンディングスフィアを描画してくれる何らかのメソッドを探してみたのだが・・・どうやらそこまで親切では無いようだ。それと第11話で、
もし、バウンディングスフィアを描画したい時は、事前に開発者側で球体の立体モデルを準備して、プロジェクトに組み込んでおかなければならないのか。
それと、立体モデルとバウンディングスフィアの関係が、視覚的にチェックできるように、球体の立体モデルを用意すべきだったかもしれない。と記した通り、やはりバウンディングスフィアを目で確認できないと、何かと不便そうだ。
そこで、今回は、実際に球体の立体モデルを用意して、それを描画することで衝突が正しく検出されているのか確認してみたい。
ますは、立体モデルの作成から始めてみる。
モデラーは、メタセコイアを使用した。
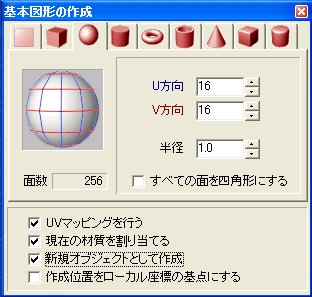
メタセコイアの基本図形の中から、「球」を選択する。
詳細設定は左の画像の通り。
重要な点は、半径を1.0に設定すること。
球体の大きさは、メタセコ基準の1.0で構わないようだ。
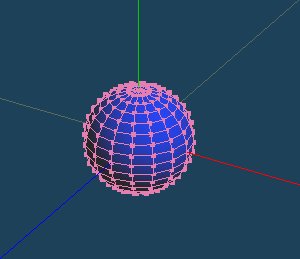
生成された球はこんな感じ。非常に小さい。
そして、立体モデルをX形式のファイル(ファイルの種類に、「Direct3D Retained Mode(*.x)」を選択)として保存する。
ファイル名は「testsphere.x」とした。
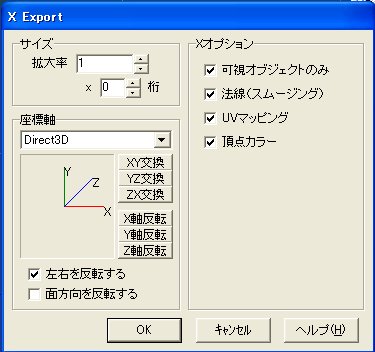
最後に、X Exportダイアログが表示されるので、左の画像のように、サイズの拡大率を1(x0桁)に設定した。
いちおう、作成したX形式ファイルをこちらに置いておく。
http://mukago.game.coocan.jp/sample/testsphere.x
続いて、VisualC#を起動して、第11話のサンプルコード(のプロジェクト)を開く。
 コンテント・パイプラインを使って、先ほどメタセコイアで作成した球体の立体モデル「testsphere.x」を、プロジェクトに組み込む。
アセット名は、デフォルトの「testsphere」とする。
この段階で、ソリューション・エクスプローラーの「Content」の階層を確認すると、左の画像のようになる。
因みに、sample_map.x(迷路の立体モデル)は今回も使用しない。
続いて、サンプルコードの改造に入る。
その前に、まずは、前回第12話の内容の一部を、サンプルコードに反映させておく。
修正する部分は、Update()メソッドの、バウンディングスフィアの中心と半径を設定するコードである。
自キャラと敵キャラの立体モデルは、メッシュが1つだけなので、とりあえず以下のように修正して誤魔化した。(苦笑)
//バウンディングスフィアに関する設定

//samplebound.Center = model_pos; //自キャラと重ねる(仮)
//testbound.Center = test_pos;    //敵キャラと重ねる(仮)
//samplebound.Radius = 1.0f;      //球体の半径
//testbound.Radius = 1.0f;        //球体の半径
samplebound.Center = model_pos + samplemodel.Meshes[0].BoundingSphere.Center;
testbound.Center = test_pos + testmodel.Meshes[0].BoundingSphere.Center;
samplebound.Radius = samplemodel.Meshes[0].BoundingSphere.Radius;
testbound.Radius = testmodel.Meshes[0].BoundingSphere.Radius;
Game1クラスのフィールドとして、球体の立体モデルの格納先となるtestsphereフィールドを用意する。
Model samplemodel;   //自キャラの立体モデル
Model testmodel;     //衝突検出用の敵キャラ
Model testsphere;    //球体の立体モデル ←追加
LoadContent()メソッドに、球体の立体モデルを読み込むコードを追加する。
ここまでは、他の立体モデルの時と同様である。
//モデルの読み込み
samplemodel = Content.Load<Model>("sample_model"); //自キャラ
//samplemap = Content.Load<Model>("sample_map");   //マップ
testmodel = Content.Load<Model>("sample_model");   //敵キャラ
testsphere = Content.Load<Model>("testsphere");    //球体 ←追加
Draw()メソッドの、自キャラと敵キャラの描画に続いて、球体の立体モデルを描画するコードを追加する。
//自キャラのバウンディングスフィアの立体モデルの描画
DrawModel(testsphere, Matrix.CreateScale(samplebound.Radius)
                      * Matrix.CreateTranslation(samplebound.Center));

//敵キャラのバウンディングスフィアの立体モデルの描画
DrawModel(testsphere, Matrix.CreateScale(testbound.Radius)
                      * Matrix.CreateTranslation(testbound.Center));
Matrix.CreateScale()メソッドで、立体モデルのスケーリングを行うマトリックスを作成する。
パラメータに、(ModelMesh.BoundingSphereプロパティから得た)バウンディングスフィアの半径を指定して、立体モデルの大きさを、バウンディングスフィアの大きさに合うように変更している。
これで、デバッグを開始してみたのだが、カメラから自キャラが近すぎるせいで、球体が画面いっぱいに描画されてしまう。
これでは、何が何だかわからない。
そこで、Draw()メソッドにある、カメラの位置を更新するコードを、少し変えてみた。
以下のように、「Vector3(0, 0, -8)」を「Vector3(0, 0, -16)」に調整している。
camera_pos = Vector3.Transform(new Vector3(0, 0, -16), Matrix.CreateRotationY(model_rotate_y))
           + model_pos;
実行結果
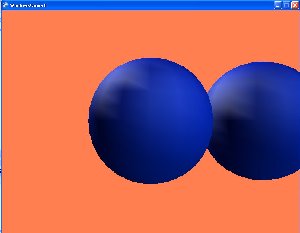
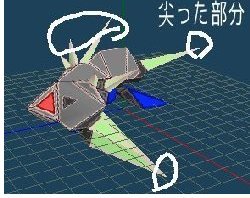
バウンディングスフィアが妙に大きくなってしまったのは、立体モデルの尖った部分を含めて被っているからである。
今回のサンプルコードの全文。
using System;
using System.Collections.Generic;
using System.Linq;
using Microsoft.Xna.Framework;
using Microsoft.Xna.Framework.Audio;
using Microsoft.Xna.Framework.Content;
using Microsoft.Xna.Framework.GamerServices;
using Microsoft.Xna.Framework.Graphics;
using Microsoft.Xna.Framework.Input;
using Microsoft.Xna.Framework.Media;
using Microsoft.Xna.Framework.Net;
using Microsoft.Xna.Framework.Storage;
namespace WindowsGame1
{
    public class Game1 : Microsoft.Xna.Framework.Game
    {
        GraphicsDeviceManager graphics;
        SpriteBatch spriteBatch;
        Model samplemodel;   //自キャラの立体モデル
        Model testmodel;     //衝突検出用の敵キャラ
        Model testsphere;    //球体の立体モデル
        //Model samplemap;     //マップの立体モデル

        Vector3 camera_pos;               //カメラの位置
        Vector3 model_pos = Vector3.Zero; //自キャラの位置
        float model_rotate_y;             //自キャラの角度

        Vector3 test_pos = new Vector3(5.0f, 0.0f, 5.0f); //敵キャラの位置

        //バウンディングスフィア
        BoundingSphere samplebound = new BoundingSphere(); //自キャラ用
        BoundingSphere testbound = new BoundingSphere();   //敵キャラ用

        public Game1()
        {
            graphics = new GraphicsDeviceManager(this);
            Content.RootDirectory = "Content";
        }

        protected override void Initialize()
        {
            base.Initialize();
        }

        protected override void LoadContent()
        {
            spriteBatch = new SpriteBatch(GraphicsDevice);

            //モデルの読み込み
            samplemodel = Content.Load<Model>("sample_model"); //自キャラ
            //samplemap = Content.Load<Model>("sample_map");   //マップ
            testmodel = Content.Load<Model>("sample_model");   //敵キャラ
            testsphere = Content.Load<Model>("testsphere");    //球体

        }

        protected override void UnloadContent()
        {
        }

        // デフォルトで1/60秒固定で呼び出される
        protected override void Update(GameTime gameTime)
        {

            //ゲームパッドに関する情報取得用
            GamePadState gamepadstate = GamePad.GetState(PlayerIndex.One);
            {
                //trueの場合、ゲームパッドが接続されている
                if (gamepadstate.IsConnected)
                {
                    //終了
                    if (gamepadstate.Buttons.Back == ButtonState.Pressed) this.Exit();

                    //立体モデルを左右に回転
                    model_rotate_y -= gamepadstate.ThumbSticks.Left.X * 0.05f;

                    //立体モデルの前進と後退
                    Vector3 vec3 = new Vector3(0, 0, gamepadstate.ThumbSticks.Left.Y * 3.0f);
                    vec3 = Vector3.Transform(vec3, Matrix.CreateRotationY(model_rotate_y)); //正面
                    model_pos.Z += vec3.Z;
                    model_pos.X += vec3.X;
                }
            }

            //バウンディングスフィアに関する設定

            //samplebound.Center = model_pos; //自キャラと重ねる(仮)
            //testbound.Center = test_pos;    //敵キャラと重ねる(仮)
            //samplebound.Radius = 1.0f;      //球体の半径
            //testbound.Radius = 1.0f;        //球体の半径
            samplebound.Center = model_pos + samplemodel.Meshes[0].BoundingSphere.Center;
            testbound.Center = test_pos + testmodel.Meshes[0].BoundingSphere.Center;
            samplebound.Radius = samplemodel.Meshes[0].BoundingSphere.Radius;
            testbound.Radius = testmodel.Meshes[0].BoundingSphere.Radius;

            base.Update(gameTime);
        }

        protected override void Draw(GameTime gameTime)
        {
            //立体モデルが衝突したかどうか?
            if (samplebound.Intersects(testbound)) GraphicsDevice.Clear(Color.Coral);
            else GraphicsDevice.Clear(Color.CornflowerBlue);

            //カメラの位置を更新
            camera_pos = Vector3.Transform(new Vector3(0, 0, -16), Matrix.CreateRotationY(model_rotate_y))
                       + model_pos;

            //マップの描画
            //DrawModel(samplemap, Matrix.CreateTranslation(Vector3.Zero));

            //自キャラの描画
            DrawModel(samplemodel, Matrix.CreateRotationY(model_rotate_y)
                                   * Matrix.CreateTranslation(model_pos));

            //敵キャラの描画
            DrawModel(testmodel, Matrix.CreateTranslation(test_pos));

            //自キャラのバウンディングスフィアの立体モデルの描画
            DrawModel(testsphere, Matrix.CreateScale(samplebound.Radius)
                                  * Matrix.CreateTranslation(samplebound.Center));

            //敵キャラのバウンディングスフィアの立体モデルの描画
            DrawModel(testsphere, Matrix.CreateScale(testbound.Radius)
                                  * Matrix.CreateTranslation(testbound.Center));

            base.Draw(gameTime);
        }


        //立体モデルの描画
        void DrawModel(Model model, Matrix world)
        {
            foreach (ModelMesh mesh in model.Meshes)
            {

                foreach (BasicEffect effect in mesh.Effects)
                {
                    //デフォルトのライティングを有効
                    effect.EnableDefaultLighting();

                    //ワールド行列を設定
                    effect.World = world;

                    //ビュー行列を設定
                    effect.View = Matrix.CreateLookAt(camera_pos, model_pos, new Vector3(0.0f, 1.0f, 0.0f));

                    //射影行列を設定
                    effect.Projection = Matrix.CreatePerspectiveFieldOfView(MathHelper.ToRadians(45.0f),
                                                                            GraphicsDevice.Viewport.AspectRatio,
                                                                            1.0f, 10000.0f);

                    //スペキュラカラーの設定
                    effect.SpecularColor = new Vector3(0.4f, 0.4f, 0.4f);

                }
                mesh.Draw();
            }

        }
    }
}
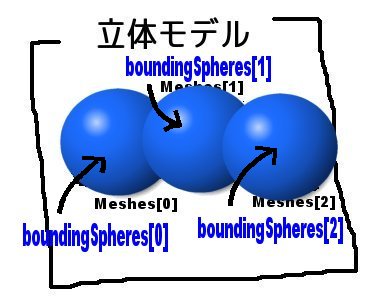 1つの立体モデルの中に複数のメッシュがある場合、各メッシュのBoundingSphereプロパティの値からバウンディングスフィアを作成すると、本当に第12話の左のイラストみたいになるのだろうか?
曖昧なままではスッキリしないので、前回第13話のサンプルコードを利用して、実際に目で確かめてみることにした。
まずは、自キャラ(&敵キャラ)の立体モデルを、以下の3つのメッシュがある階層付きX形式ファイルに変更(従来のファイルを上書き)した。
3つのメッシュのうち、1つは従来の謎のメカである。(笑)
2つ目のメッシュは赤い六角錐、3つ目は緑の六角錐だ。

この段階での実行結果・・・・・・つまり、Meshes[0]のバウンディングスフィアの描画
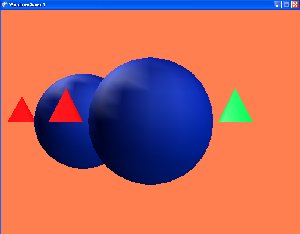
次に、2つ目のメッシュである赤い六角錐(Meshes[1])のバウンディングスフィアを描画してみる。
Update()メソッドの、バウンディングスフィアに関する設定を行っているコードを修正する
samplebound.Center = model_pos + samplemodel.Meshes[1].BoundingSphere.Center;
testbound.Center = test_pos + testmodel.Meshes[1].BoundingSphere.Center;
samplebound.Radius = samplemodel.Meshes[1].BoundingSphere.Radius;
testbound.Radius = testmodel.Meshes[1].BoundingSphere.Radius;
実行結果
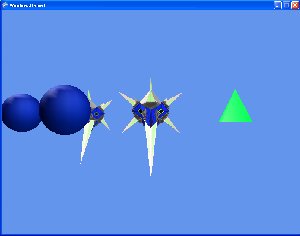
赤い六角錐が球体に被われた。
最後に、緑の六角錐(Meshes[2])のバウンディングスフィアを描写してみる。
再び、Update()メソッドの同じ部分に手を加える。
samplebound.Center = model_pos + samplemodel.Meshes[2].BoundingSphere.Center;
testbound.Center = test_pos + testmodel.Meshes[2].BoundingSphere.Center;
samplebound.Radius = samplemodel.Meshes[2].BoundingSphere.Radius;
testbound.Radius = testmodel.Meshes[2].BoundingSphere.Radius;
実行結果
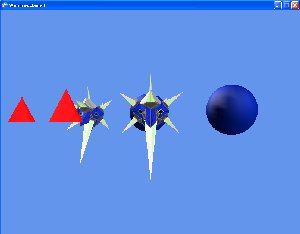
今度は緑の六角錐が球体に被われた。
どうやら予想通りのようだ。
今回使用した階層付きX形式ファイルをこちらに置いておく
(テクスチャとなるビットマップファイルは従来のものを使用)。
自分で試してみたい方はどうぞ。
http://mukago.game.coocan.jp/sample/m3/sample_model.x
※ただし、今回はあくまで各メッシュのBoundingSphereプロパティの値を調べるのが目的なので、自キャラを回転させることは考慮していない(バウンディングスフィアの位置がズレてしまう)。

